Map
The core feature of the Sygic Maps SDK is Maps. The key concepts covered in this section include adding
a map to an Android application, changing the location displayed by the map and its various properties.
The classes covered include MapFragment and MapView. The MapFragment is a standard Android Fragment
derived component. It is creating and managing a child View for rendering the map. This view is created during
fragment's onCreateMethod and attached as a child view to the fragment and wrapped by the SDK class MapView.
Depending on the specified parameter, this view may be of a type SurfaceView (default) or TextureView.
To obtain an instance of MapView from the fragment call the suspend function MapFragment.getMapAsync():
// run inside your suitable coroutine scope
val getMapResult = mapFragment.getMapAsync()
if (getMapResult is GetMapResult.Success) {
    // now you can use the returned MapView
    val mapView = getMapResult.mapView
}
Once the map is ready, you can get the MapView synchronously, using the MapFragment.mapView.
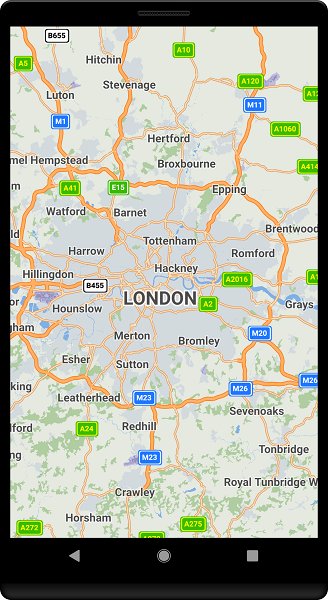
For example, the following code snippet illustrates how to render the Map at London, UK:
// get MapView
val map = mapFragment.mapView

// Set the map center to London, UK.
map?.cameraModel?.position = GeoCoordinates(51.509865, -0.118092)
// Set the zoom level to 12
map?.cameraModel?.zoomLevel = 12F
To enable online maps, call OnlineManagerProvider.getInstance().enableOnlineMapStreaming().
To display offline maps, see Offline Maps.
In the preceding code the GeoCoordinates for the map center is created by a call
to the GeoCoordinates(Double, Double) constructor.
Map Handling
Once the MapView is initialized, it can be manipulated and interacted with in a variety of ways.
Some key attributes of the MapView are its orientation, tilt, geographical center (geoCenter), and
zoom level (zoom). You can use these to customize the displayed map via the Camera class.
Zoom Level
The size of the geographical area displayed by Map can be controlled by changing the zoom level. The values can be in the interval between 0 and 20, where 0 is the highest view (you will see the whole Earth) and 20 is the lowest view, almost on the road.
// Set the zoom to for example 18.5.
mapFragment.mapView?.cameraModel?.zoomLevel = 18.5F

// Get the zoom level, should be 18.5.
val zoom = mapFragment.mapView?.cameraModel?.zoomLevel
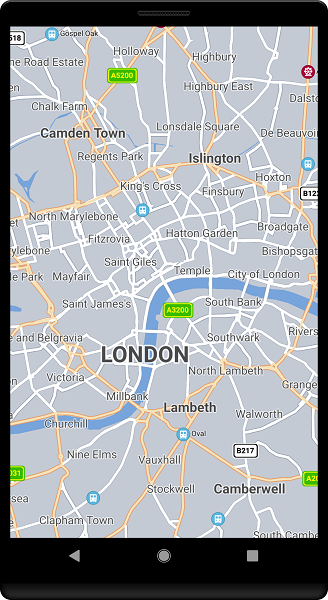
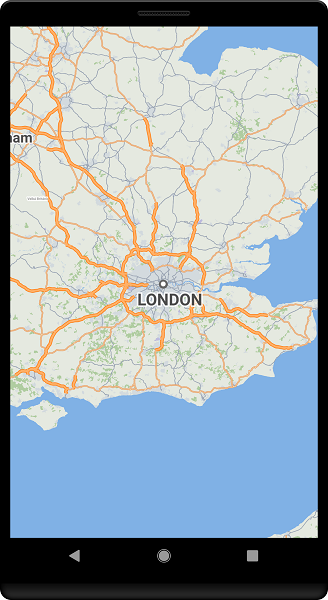
Below is the center of London on zoom level 6, 12 and 18:

Rotation
The map can be rotated in any direction from 0 to 360 degrees (rotating counter-clockwise). By default, the rotation is in a true North position (0 degrees). For example, use rotation of 90 degrees to look to the West, 180 degrees to look to the South and 270 degrees to look to the East. The following code changes the orientation to South-up (180 degrees).
// Rotate by 180 degrees.
mapFragment.mapView?.cameraModel?.rotation = 180F

// Get the rotation that you have set above - the returned value should be 180.
val rotation = mapFragment.mapView?.cameraModel?.rotation
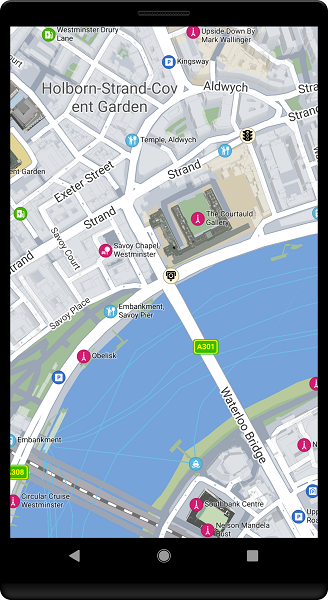
Below is the center of London rotated to North-up (0 degrees rotation) and to the West-up (90 degrees rotation)

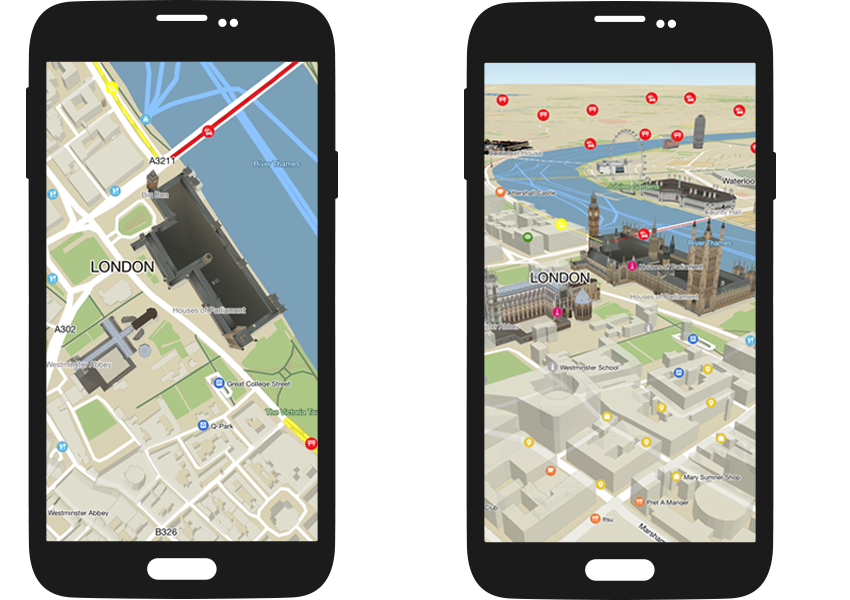
Tilt
The map can be tilted between 0 and 90 degrees and rendered in a three-dimensional perspective. By default, the tilt is 0 degrees which means the map looks completely flat (two-dimensional, camera is looking perpendicularly down). Changing this value to anything above 0 will tilt the camera in the specified degree and you will see the map in 3D.
// Set the tilt to 45 degrees
mapFragment.mapView?.cameraModel?.tilt = 45F

// Get the tilt
val tilt = mapFragment.mapView?.cameraModel?.tilt
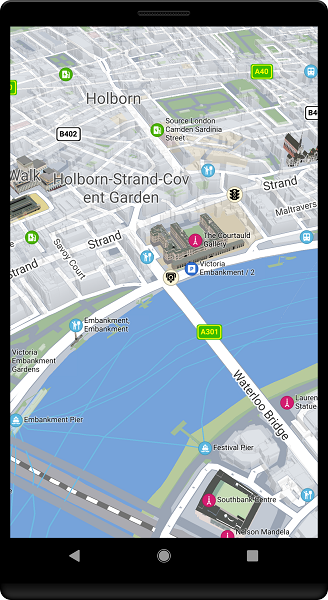
Below is the center of London with tilt 0 degrees and tilt 45 degrees
Camera modes
You can set Camera to change position or rotation automatically by setting an appropriate mode.
Using the Camera.MovementMode.FollowGpsPositionWithAutozoom, the camera follows the vehicle automatically.
If you use this option along with the vehicle rotation set to Vehicle, the camera will rotate according to the vehicle's
heading and it will also zoom in when approaching a junction and then zoom out.
Below is an example of how to set this.
mapFragment.mapView?.cameraModel?.apply {
    movementMode = Camera.MovementMode.FollowGpsPositionWithAutozoom
    rotationMode = Camera.RotationMode.Vehicle
}
Camera listeners
If you want to be notified about certain camera events, you can simply collect camera mode changes flow this way:
// run inside your suitable coroutine scope
mapView.cameraModel.modeChanges().collect {
  if (it is CameraModeChangeData.MovementModeChanged) {
      when (it.mode) {
          Camera.MovementMode.Free -> {
              // gps position will not be followed by camera in any way
          }
          Camera.MovementMode.FollowGpsPositionWithAutozoom -> {
              // camera will follow gps position and zoom in and out according to your speed
          }
          Camera.MovementMode.FollowGpsPosition -> {
              // camera will follow gps position (without autozoom)
          }
      }
  }

  if (it is CameraModeChangeData.RotationModeChanged) {
      when (it.mode) {
          Camera.RotationMode.Free -> {
              // camera will not rotate with your device
          }
          Camera.RotationMode.NorthUp -> {
              // map will always be displayed north-up
          }
          Camera.RotationMode.Attitude -> {
              // camera will rotate according to attitude
          }
          Camera.RotationMode.Vehicle -> {
              // camera will rotate according to vehicle
          }
      }
  }
}
or
// run inside your suitable coroutine scope
mapView.cameraModel.positionChanges().collect {
    if (it is CameraPositionChangeData.PositionChanged) {
        // camera position changed
    }
    else if (it is CameraPositionChangeData.PositionChangeCompleted) {
        // e.g. when moving animation finished
    }
}
If you no longer need camera updates, don't forget to stop collecting corresponding flow.
Default map click handling
Touches on map are handled internally by the MapFragment. If you want to perform an action on click (like
displaying a context menu, a bubble on the map, etc.), you have to register a MapGestureListener. We also
provide the MapGestureAdapter class that provides default implementations so you can override only the methods
that you need.
val mapGestureAdapter = object : MapGestureAdapter() {
    override fun onMapClicked(e: MotionEvent?, isTwoFingers: Boolean): Boolean {
        // do something
        return true
    }
}
mapFragment.mapView?.addMapGestureListener(mapGestureAdapter)
This will collect only the map click events. Then you can get the GeoCoordinates from the place where you tapped on the screen,
val geoCoordinates = mapView.geoCoordinatesFromPoint(motionEvent.x.toInt(), motionEvent.y.toInt())
where {x, y} are screen coordinates of point inside of the MapFragment (obtained for example from
MotionEvent object).
Initial map state
By default, the map will show a whole globe after initialization. If you are adding the fragment dynamically
in code, you can use factory method MapFragment.newInstance() and pass it your wanted initial CameraState.
val cameraState = CameraState.Builder()
    .setPosition(GeoCoordinates(40.730655, -73.997437))
    .setZoomLevel(18.5F)
    .build()
MapFragment.newInstance(cameraState)
FPS Configuration
You can set a custom FPS (frames per second) configuration. You can choose between two modes - Balanced
and Performance. These two modes are affected by the targetFps value. If you choose the Performance mode,
the engine always tries to achieve the targetFps value. If you choose the Balanced mode, the targetFps value
is the lowest the engine should go in order to preserve battery life.
The default is Balanced at 15FPS.
Let's see how to set the FpsConfig for the map to always try to run at 60fps:
mapFragment.mapView?.fpsLimit = FpsConfig(FpsConfig.FpsMode.PERFORMANCE, 60F)
Gestures
The MapView class responds to a number of predefined touch gestures. The default behavior of the map
for each gesture type may be used as-is, supplemented, or replaced entirely. The following table is a
summary of the available gestures and their default behavior.
| Gesture | Description | Following gestures |
|---|---|---|
| Rotate | Rotate: Two-finger press, simultaneously orbit both fingers around the center point, lift | Pinch, Spread, Move |
| Zoom out | Pinch: Two-finger press, move inwards, lift | Spread, Rotate, Move |
| Zoom in | Spread: Two-finger press, move outwards, lift | |
| Move | Swipe: One-finger press, move, lift/don't lift | |
| Tilt | Tilt: Two fingers press, move up (increase the tilt angle) or move down (decrease the tilt angle) | |
| Short touch | Short touch: One-finger press, lift |
Map input like map dragging, map rotation, map tilt, map zoom is handled internally by MapFragment.
However you can override the default behavior by setting your own listener:
val mapGestureAdapter = object : MapGestureAdapter() {
    override fun onMapMove(e1: MotionEvent?, e2: MotionEvent?, distanceX: Float, distanceY: Float): Boolean {
        // do something
        return true
    }
}
mapFragment.mapView?.addMapGestureListener(mapGestureAdapter)
Set the return value to true if the listener has consumed the event, false otherwise. If false is returned, the default gesture action will be executed.
Map Language
Our maps (except OSM) have multilang tables which contain translations of city/street/POI names for several languages. Please note that it is our map providers who provide us with the translations and we cannot modify the translations.
The language is set globally using the Android's Locale and can not be set for specific countries. We recommend changing the map language according to the language of your application, or the system's current Locale.
Setting the language is as easy as this:
mapView.setMapLanguage(Locale("fr"))
For example, Belgium mostly has street names translated to Dutch and French. If you set the French language, the name of a street might appear as "Rue de l'Église". If you change the language to Dutch, the map will reload and the same text will be shown as "Kerkstraat". If you set a language that does not have a translation for that specific name, the default language will be used, in case of Belgium it would be Dutch.
Unfortunately, as of now there is no method to get the available languages or check what is the default language. We hope to add this possibility in the future.
Objects and Interaction
The Sygic Maps SDK allows the addition of a variety of objects, each with a specific purpose, to a map view via its map
data model. The types of available objects include map markers, routes, polylines, circles, polygons. To see all the objects
check the MapObject.MapObjectType. Some objects are described in more detail below.
In order to display the map object on the map, the object needs to be added to a MapView's data model
by calling addMapObject(). Map data model will properly handle all MapView states and insert objects into the map only
when the map is ready. The objects are initialized using a builder.
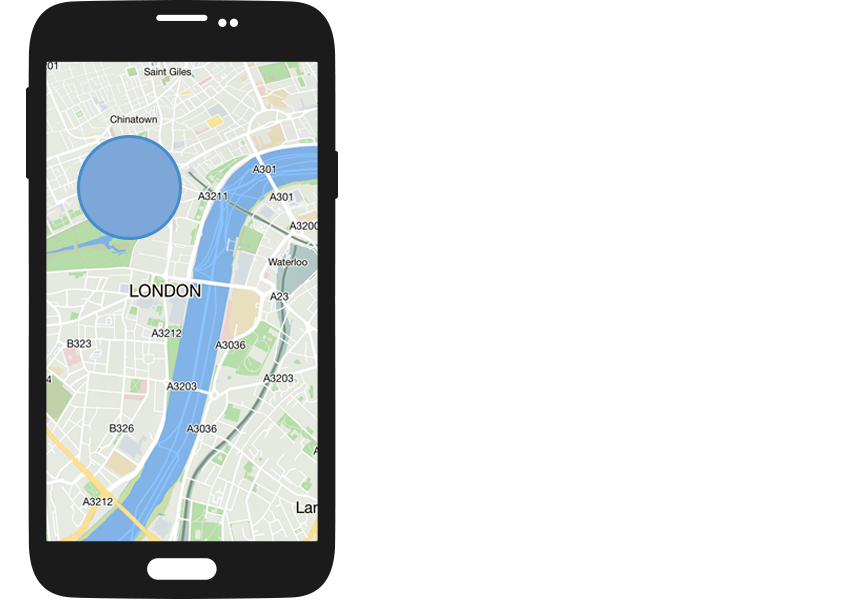
MapCircle
Enables you to draw a circle on the map at a fixed geographical location. You can customize you circle's color,
radius, lineColor - see the MapCircle API reference for more information.
val mapCircle = MapCircle.at(GeoCoordinates(51.509865, -0.118092))
    .setRadius(200.0)
    .build()
mapFragment.mapView?.mapDataModel?.addMapObject(mapCircle)

// you can remove the circle like this
mapFragment.mapView?.mapDataModel?.removeMapObject(mapCircle)
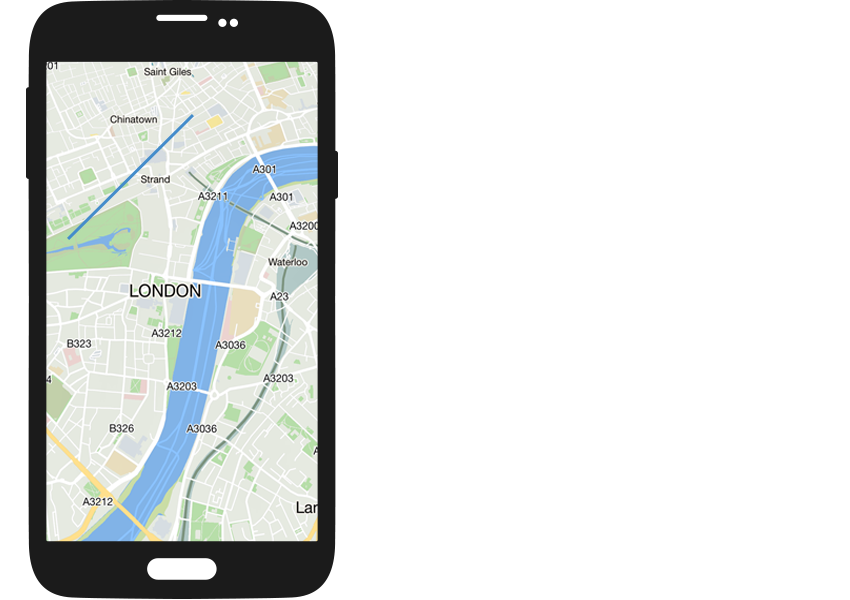
MapPolyline
Enables you to draw one or more connected line segments on the map. The segment vertices are specified by a series of GeoCoordinates. The visual appearance of the polyline can also be customized. See the MapPolyline API reference for more information.
val coordinates = listOf(
    GeoCoordinates(51.509, -0.118),
    GeoCoordinates(51.524, -0.137),
    GeoCoordinates(51.572, -0.092)
)
val polyline = MapPolyline.of(coordinates).build()
mapFragment.mapView?.mapDataModel?.addMapObject(polyline)

// remove the polyline
mapFragment.mapView?.mapDataModel?.removeMapObject(polyline)
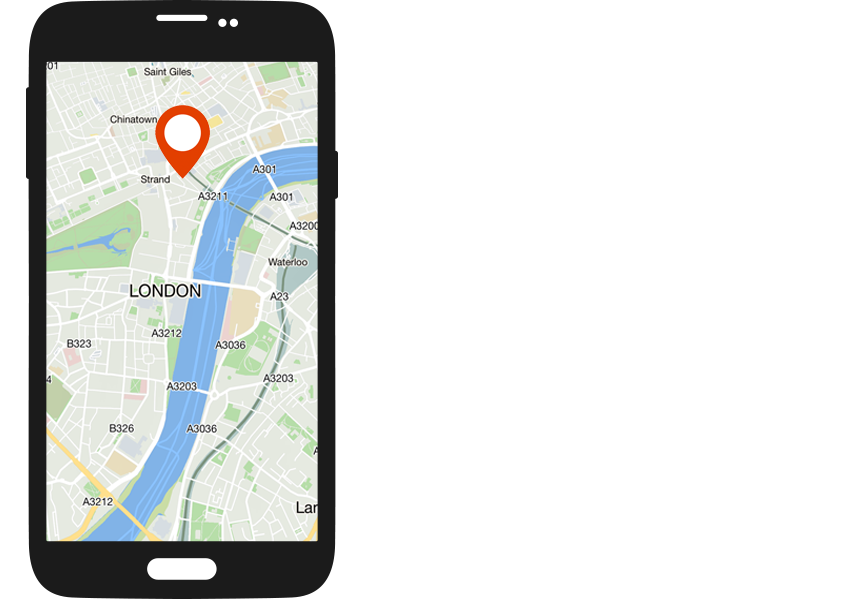
MapMarker
With Sygic Maps SDK, you can display an icon at a fixed geographical position on the map.
val mapMarker = MapMarker.at(GeoCoordinates(51.509865, -0.118092)).build()
mapFragment.mapView?.mapDataModel?.addMapObject(mapMarker)

// remove the marker
mapFragment.mapView?.mapDataModel?.removeMapObject(mapMarker)
You can also provide your own image by using the
BitmapFactory
class. SDK provides two factories for creating markers from Bitmap or Drawable.
val marker1 = MapMarker.at(GeoCoordinates(51.509865, -0.118092))
    .withIcon(DrawableFactory(R.drawable.ic_marker))
    .build()

val bitmap: Bitmap = getBitmap()
val marker2 = MapMarker.at(GeoCoordinates(51.515436, -0.122045))
    .withIcon(SimpleBitmapFactory(bitmap))
    .build()
MapPolygon
A MapPolygon can be displayed on the map since the version 17. You can customize the border/center colors,
their radiuses or its center.
val geoList = listOf(
    GeoCoordinates(48.164498, 17.160628),
    GeoCoordinates(48.141367, 17.099931),
    GeoCoordinates(48.113529, 17.124068),
    GeoCoordinates(48.126849, 17.199407),
    GeoCoordinates(48.145362, 17.164499)
)
val mapPolygon = MapPolygon.of(GeoCoordinates(48.147267, 17.150949), geoList)
    .setCenterColor(Color.TRANSPARENT)
    .setBorderRadius(0.999999F)
    .setCenterRadius(0.95F)
    .setBorderColor(Color.BLUE)
    .build()
mapFragment.mapView?.mapDataModel?.addMapObject(mapPolygon)
MapSmartLabel
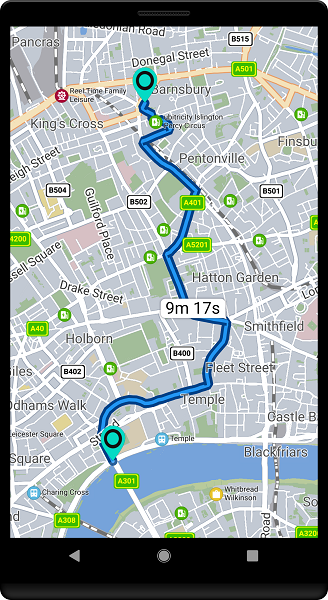
A MapSmartLabel is a map object using which you can show text in a label that is pinned to the route.
It is mostly used when displaying the route's duration while choosing between different routes.
A MapSmartLabel is created in the following example with the help of an already-computed route.
You can read how to compute a route in the Routing section.
val mapTextStyle = StyledText.MapTextStyle().apply {
    textSize = 22F
    borderSize = 2F
}
val styledText = StyledText("${minutes}m ${seconds}s", mapTextStyle)

mMapView.mapDataModel.addMapObject(
    MapSmartLabel.with(mRoute)
        .setMaxImageSize(900, 700)
        .setMaxZoomLevel(17f)
        .setText(styledText)
        .build()
)
MapPlaces and Clustering
MapPlace objects are objects similar to a MapMarker, but with advanced functionality. These objects
have their own ID, description, coordinates and a MapPlaceCategory. You can define a number of categories and define
a cluster or clusters using which the places will be grouped when zoomed out. This can largely affect the user experience
in case that you have a lot of clickable (or non-clickable) images that you want to add to the map.
Let's start by defining the image styles. For this specific example, we have chosen an image from the default SDK drawables.
val categoryImageStyle1 = MapPlaceCategory.ImageStyle(
    DrawableFactory(R.drawable.sygic_sdk_speed_limit_us),
    MapPlaceCategory.Placement(false, Point2F(0.5f, 0.5f))
)

val clusterImageStyle1 = MapPlaceCategory.ImageStyle(
    DrawableFactory(R.drawable.sygic_sdk_speed_limit_us),
    MapPlaceCategory.Placement(false, Point2F(0.5f, 0.5f))
)
We chose the same image for the category and for the cluster but it might be a good practice to create your own "circle" design for the cluster image.
Next, let's create a text style.
val textStyle = MapPlaceCategory.TextStyle(StyledText.MapTextStyle().apply {
    fontFamily = "Arial"
    textSize = 16.0f
    borderSize = 0.5f
    textColor = Color.argb(255, 255, 0, 0)
    borderColor = Color.argb(255, 255, 255, 255)
}, MapPlaceCategory.Placement(false, Point2F(0.5f, 0.5f), null))
The MapPlaceCategory.Placement's first argument is inBackground : set it to true if you want the text to be centered
over behind the image, or false if it should be on the right side of the image. You can still set the anchor using the
second argument. Also, the third argument (which is null in the example) stands for padding which can be set using a
Rect object.
Then we can create our first MapPlaceCategory.
val cat1 = MapPlaceCategory(
    "cat1", // ID of the category
    null, // background style
    textStyle,
    categoryImageStyle1, // the image style that we have created above
    "cluster", // the ID of the cluster that we will define in a moment
    10f // zoom limit
)
Then let's create a cluster category, which will be used for grouping objects that belong to the cat1 category.
val cluster = MapPlaceCategory(
    "cluster", // ID of the category
    null, // background style
    textStyle,
    clusterImageStyle1, // the image style for the cluster
    "", // the cluster has no other cluster that it should be assigned to
    8F // zoom limit
)
After specifying the categories, we can get to creating several MapPlaces.
val places = arrayOf(
    MapPlace(
        45, // ID
        "first place", // description
        GeoCoordinates(48.0991381130956, 17.237018659823903), // location
        "cat1" // category to which the MapPlace belongs
    ),
    MapPlace(
        24, "second place", GeoCoordinates(
            48.09862059241258, 17.237648805497336
        ), "cat1"
    ),
    MapPlace(
        25, "third place", GeoCoordinates(
            48.098978876517194, 17.238287466652846
        ), "cat1"
    ),
    MapPlace(
        26, "fourth place", GeoCoordinates(
            48.09811444077143, 17.23766583646148
        ), "cat1"
    ),
    MapPlace(
        27, "fifth place", GeoCoordinates(
            48.09957601114294, 17.236763195361704
        ), "cat1"
    ),
    MapPlace(
        28, "sixth place", GeoCoordinates(
            48.09934284511447, 17.236167111616563
        ), "cat1"
    )
)
You can see that their IDs are different and they all belong to the category "cat1".
After creating the MapPlaces, we can add the places into the map by calling fillPlaces().
val result = MapPlacesManagerProvider.getInstance().fillPlaces(places, arrayOf(cat1, cluster))
if (result == false) {
  //handle error
}
You can see that the method fillPlaces() has been called with the array of MapPlace objects that was created above and
the array of MapPlaceCategory objects.
The images of the MapPlaces should now be visible on the map and should be properly clustered once zoomed out.
Map Schemes (skins)
There are some map schemes available so you can offer a different kind of map appearance to your users. The list of available schemes can be obtained by:
val availableSkins = mapFragment.mapView?.availableSkins
Some of the options are "default", "day", "night", "car", "pedestrian". The schemes can be
combined as they are only incremental.
mapFragment.mapView?.mapDataModel?.setSkin(listOf("day", "pedestrian", "default"))
By default, MapView is created with skins "day" and "default". "default" skin contains all skinnable attributes
with their default values optimized for browsing map during daylight usage.
However, these default values may be overridden by additional skins like "night", "car", etc.
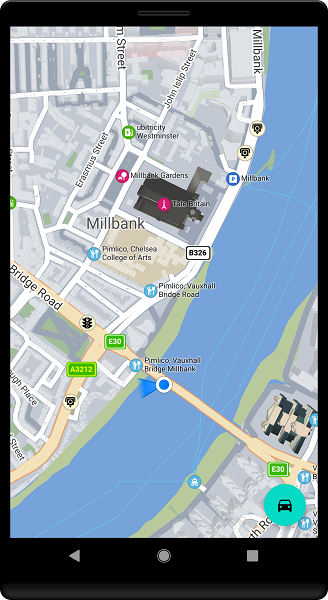
For example, if you set "pedestrian" and "default", you will get the same map with pedestrian indicator of your GPS
position, like this:
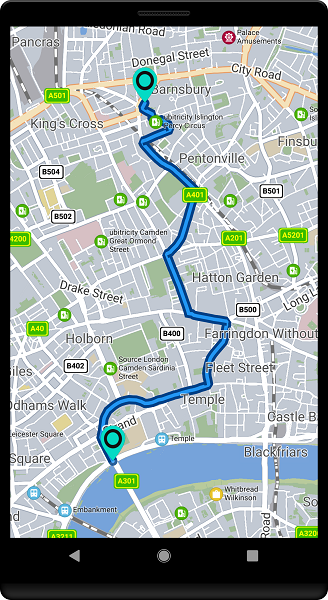
On the other hand, if you set "car", "default", you will get slightly bigger street names, different POI visibility
settings and vehicle (triangle) indicator of your GPS position, like this:

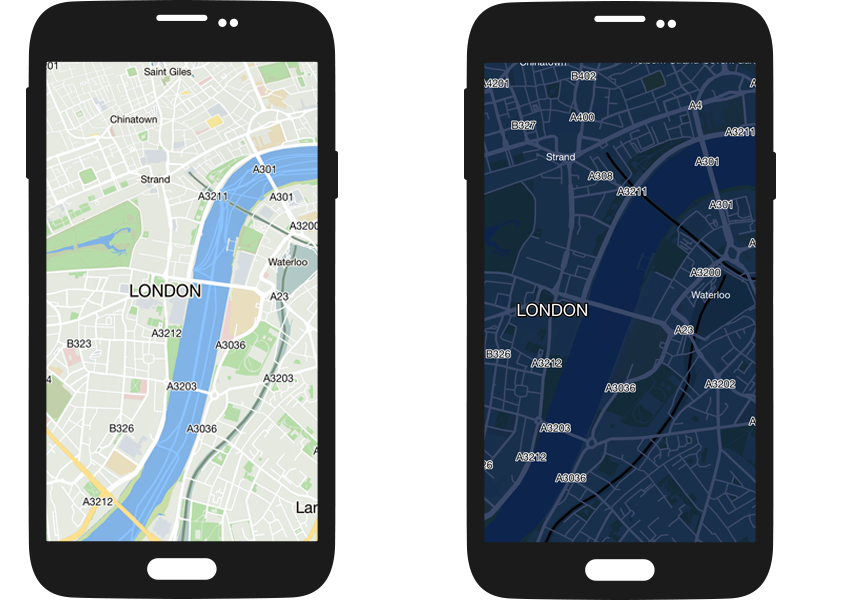
And finally, this is the difference between "day" and "night" skins:
Sygic Maps SDK does not automatically switch map schemes during navigation mode. Before starting car or pedestrian navigation, be sure to save the current map scheme and switch to the appropriate navigation map scheme.
Setting a camera map rectangle
It is possible to set a map center using a MapRectangle or using a GeoBoundingBox.
For example, this is how you zoom onto a route with 15% margins from each side of the display.
The first example is using a MapRectangle, which uses a previously computed route's bounding box and has its own
margin definitions. The second one uses just the GeoBoundingBox and the margins are defined after that.
// first example
mMapView.cameraModel.setMapRectangle (
    MapRectangle (
        mRoute.boundingBox,
        0.15f,
        0.15f,
        0.15f,
        0.15f
    ),
    MapAnimation (
        500,
        MapAnimation.InterpolationCurve.AccelerateDecelerate
    )
)

// second example
mMapView.cameraModel.setMapRectangle (
    mRoute.boundingBox,
    0.15f,
    0.15f,
    0.15f,
    0.15f,
    MapAnimation (
        500,
        MapAnimation.InterpolationCurve.AccelerateDecelerate
    )
)
Another example, if you want to show whole London using its bounding box, you can do it like this:
val topLeft = GeoCoordinates(51.692701, -0.561623)
val bottomRight = GeoCoordinates(51.303139, 0.380848)
val boundingBox = GeoBoundingBox(topLeft, bottomRight)
val margin = 10 // pixels
// fit London bounding box on the map with 10 pixel margin around the screen edges
mapFragment.mapView?.cameraModel?.setMapRectangle(boundingBox, margin, margin, margin, margin)
Disabling visibility of objects
It is possible that you would not want to see some of the objects that are shown directly in the map by default, such as 3D buildings, POIs or even roads. You can simply disable them like this:
mapFragment.mapView?.mapDataModel?.apply {
    setMapLayerCategoryVisibility(MapView.MapLayerCategory.Roads, false) // disables visibility of roads
    setMapLayerCategoryVisibility(MapView.MapLayerCategory.Landmarks, false) // disables visibility of 3D buildings (landmarks)
}
To enable them back again, simply call the same code passing a "true" value.
Requesting objects from map
To query what objects are displayed on map, you can call method MapView.requestObjectsAtPoint().
You can for example use a point returned from onMapClicked().
val mapGestureAdapter = object : MapGestureAdapter() {
    override fun onMapClicked(e: MotionEvent, isTwoFingers: Boolean): Boolean {
        // use your suitable scope
        scope.launch {
            val result = mapView.requestObjectsAtPoint(e.x, e.y)
            result.viewObjects.forEach { viewObject ->
                // do something with found objects
                val objectType = viewObject.objectType
            }
        }
        return true
    }
}
mapFragment.mapView?.addMapGestureListener(mapGestureAdapter)
In the result.viewObjects there will be a list of objects, as multiple objects can be displayed in the
same area. They can have following types:
ScreenObject
This is the basic object that will be returned from every call to requestObjectsAtPoint().
It has only GeoCoordinates that can be retrieved using a getPosition() call.
MapObjects
This can be any object mentioned previously in Objects and Interaction that was added to map.
ProxyObjects
These are objects rendered by map itself, such as Places (previously Points of Interest) (ProxyPlace) or cities
(ProxyCity). Obtaining detailed information about these Place objects is expensive data operation, therefore this
information should be loaded via ProxyObjectManager.PlaceLinkListener(). Loaded information is provided as
PlaceLink object which contains some basic attributes like name or place category. To obtain every available
information, another call should be made to PlacesManager.loadPlace with given PlaceLink object as parameter.
Example code:
val proxyPlace: ProxyPlace // viewObject of type ProxyPlace from requestObjectsAtPoint call
val placeLinkListener = object : ProxyObjectManager.PlaceLinkListener {
    override fun onPlaceLinkLoaded(placeLink: PlaceLink) {
        val category = placeLink.category
        val name = placeLink.name

        PlacesManagerProvider.getInstance(object : CoreInitCallback<PlacesManager> {
            override fun onInstance(placesManager: PlacesManager) {
                placesManager.loadPlace(placeLink, object : PlacesManager.PlaceListener {
                    override fun onPlaceLoaded(place: Place) {
                        val placeDetails = place.details
                    }

                    override fun onPlaceError(code: PlacesManager.ErrorCode) {}
                })
            }

            override fun onError(error: CoreInitException) {}
        })
    }

    override fun onPlaceLinkError(eCode: PlacesManager.ErrorCode) {}
}
ProxyObjectManager.loadPlaceLink(proxyPlace, placeLinkListener)
Bread Crumbs
In release 17.1.0 a new functionality has been added - BreadCrumbs. When you move, it shows a "trail" behind
your vehicle. Please note that you need to turn this function on in the JSON configuration for it to be active.
You can also set it in the builder: SygicEngine.JsonConfigBuilder().mapSettings().breadcrumbsEnabled(true).
Let's see how to use BreadCrumbs - at first you need to have a mapView. After that, just call the MapView's
getBreadCrumbs() and also make sure that it's not null:
mMapView.breadCrumbs?.start() // to start showing the bread crumbs on map
mMapView.breadCrumbs?.setVisibility(BreadCrumbs.Visibility.Hidden) // to hide the visibility
mMapView.breadCrumbs?.clear() // to delete the visible bread crumbs path - this does not stop it!
mMapView.breadCrumbs?.stop() // this stops the logging
Logistic Information
If the maps that you are using contain logistic information, you can show the info in the map.
For example, if there's an exception for trucks that contain hazardous materials, the whole route
will be greyed-out with an icon over it. If you choose "Truck" as the vehicle for which the logisticInfo
should be applied, the roads which are not accessible for truck will be grey, too.
All you need to do is to create a LogisticInfoSettings object and set it to the mapView.
Let's see how to do it and more:
val logisticInfoSettings = LogisticInfoSettings()
logisticInfoSettings.vehicleType = LogisticInfoSettings.VehicleType.Truck
logisticInfoSettings.hazmatTypes = RoutingOptions.HazardousMaterialsClass.GoodsHarmfulToWater
logisticInfoSettings.maximumHeight = 3500 // in centimeters
logisticInfoSettings.vehicleWeight = 40000 // in kilograms
mMapView.setLogisticInfoSettings(logisticInfoSettings)
On top of that, you can change the appearance of several images, like this:
val image = RestrictionImage.Builder(R.drawable.xxxxxx).build()
logisticInfoSettings.setLogisticRestrictionImage(RestrictionImage.Config.create(MapView.CountrySignage.World, LogisticInfoSettings.IconType.VehicleWidth), image)
Incident Warning settings
It's possible that you would want to override the images of the incidents that are shown in the map.
These are the icons of speed cameras, school zones etc., that keep popping up and disappear after several hours.
At first, you will need to create a class that inherits from a BitmapFactory or Drawable factory and override
the methods where the bitmap is created and use your own.
In this example we won't create one but we will directly call it IncidentBitmapFactory.
Consider this code:
val incidentWarningSettings = IncidentWarningSettings()
incidentWarningSettings.setImageOffset(0.5F, 1f)
// you can choose if you want to see different incident images while browsing the map or only while navigating
// we choose "Both" in this example
incidentWarningSettings.usage = IncidentWarningSettings.Usage.Both
// now we can set the images for different types of incidents
// all incident types can be found in the IncidentType class
incidentWarningSettings.setIncidentImage(IncidentType.Crash, IncidentBitmapFactory(R.drawable.crashImage))
incidentWarningSettings.setIncidentImage(IncidentType.Police, IncidentBitmapFactory(R.drawable.policeImage))
// and now just set it to the MapView that you got for example from MapFragment.getMapAsync() call
mapView.setIncidentWarningSettings(incidentWarningSettings)